Corner Simulations using ADE XL: Difference between revisions
Jump to navigation
Jump to search
| Line 1: | Line 1: | ||
==Corner Simulations using ADE XL== | ==Corner Simulations using ADE XL== | ||
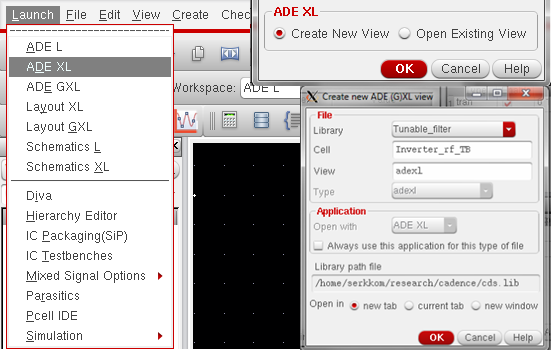
*Select '''Launch''' tab in the schematic. | *Select '''Launch''' tab in the schematic. | ||
**Select '''ADE XL'''. | **Select '''ADE XL'''.
[[Image:ADE XL.png|center|border]] | ||
[[Image:ADE XL.png|center|border]] | |||
**Select '''Create New View''' and then '''OK'''. | **Select '''Create New View''' and then '''OK'''. | ||
[[Image:ADE XL window.png|center|border]] | [[Image:ADE XL window.png|center|border]] | ||
Revision as of 17:03, 12 July 2012
Corner Simulations using ADE XL
- Select Launch tab in the schematic.
- Select ADE XL.
- Select Create New View and then OK.
- Select ADE XL.


- Once you have created a new ADE XL window view, go to the
Data Viewwindow and select Tests.- Clcik Add Test.
- Setup the tests, model files, variables and outputs in the ADE L window.
- Added tests (etc.) should appear under Tests in
Data Viewwindow.

- In the
Data Viewwindow, select Corners.- Click Add Corner.

- Click Add Model File.
- Click Import from Test.
- Add other model files if needed.
- Click Add new corner.

- Click section and set the desired corner for the model files.
- Rename the added test to match corner simulation (Optional).
- Repeat the above for all corner tests.
- Click OK.
- Click Add Model File.


- Added corners should appear under Corners in
Data Viewwindow.
- Added corners should appear under Corners in
- Run the simulation.
- To plot the results:
- Right click on graph symbol corresponding to the parameter you wish to plot.
- Select Plot Across Corners.
