Team Gryffindor: Difference between revisions
No edit summary |
No edit summary |
||
| Line 86: | Line 86: | ||
This is a great website teachs us how it works, and it also provide some examples, which help us to implement in C code. | This is a great website teachs us how it works, and it also provide some examples, which help us to implement in C code. | ||
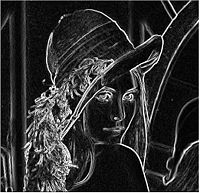
Sobel edge detection algorithm code with C (Since the code is very long, I just show key part of algorithm): | Sobel edge detection algorithm code with C (''Since the code is very long, I just show key part of algorithm''): | ||
int sobel(double threshold) { | int sobel(double threshold) { | ||
unsigned int x, y, i, v, u; // for loop counter | unsigned int x, y, i, v, u; // for loop counter | ||
unsigned char R, G, B; // color of R, G, B | unsigned char R, G, B; // color of R, G, B | ||
Revision as of 17:32, 11 February 2012

| |||||
| Gryffindor Team Logo | |||||
|---|---|---|---|---|---|
| |||||
Connecting to the Convey HC-1 Machine
- Download and install NX Client.
- Connect to convey-1.ece.iastate.edu using your ISU NetID and the password yournetid@123.
- Change your password by opening a terminal window and running the passwd command.
NX Tip: Use GNOME as your windowing environment (for speed), and if you have trouble connecting, make sure you unselect the decrypt all traffic.
You can access the shared /home/cpre584_t2 folder by using the su cpre584_t2 command and entering our team password.
Alternatively, you can access the two files Jone's created for us on the shared folders here on the wiki:
- Setup your Convey environmental variables (Jone's Script)
- Here's a copy of the Xilinx 11.1 src file:
source /remote/Xilinx/11.1/settings64.sh
export PATH=$PATH:/remote/Modelsim/6.4b/modeltech/linux_x86_64/
export LM_LICENSE_FILE=1717@io.ece.iastate.edu:27006@io.ece.iastate.edu
Convey architecture overview
-> ppt goes here
Vector Adder Example
-> ppt goes here
Running the Sample Program using the Fabric
Section 10.5 of PDK Reference Manual explains how to run the sample software application. It has been reproduced below in brief.
The rev version installed on the Convey machine is from 2010-8-9; to copy the sample app's source code run:
cd ~
mkdir pdk_sample
cp -r /opt/convey/pdk/2010_08_09/cae_pers_vadd pdk_sample
cp -r /opt/convey/pdk/2010_08_09/pdk_apps/SampleAppVadd pdk_sample
To make the sample project.
cd ~/pdk_sample/cae_pers_vadd/CaeSimPers/
make
cd ~/pdk_sample/SampleAppVadd/
make
This compiles both an emulator (CaeSimPers) and a C program that makes a coprocessor call to use the vector adder (UserApp.exe). You'll want to make sure that you haven't set your environmental variables. You can do this by simply using a new terminal window or by running export CNY_SIM_THREAD=. To run the sample application on the coprocessor fabric, you'll need to make sure the CNY_SIM_THREAD environment variable is unset or 0. To run the software version of the app:
cd ~/pdk_sample/SampleAppVadd/
./UserApp.exe
You should see the program run and output the following:
You can also set the CNY_CALL_STATS environment variable; this variable gives back the number of times the coprocessor was called. I.E. for this application, the coprocessor is called once. Output from the terminal is reproduced in the following file:
Running in the SW Model
To run the sample application on the Coprocessor simulator, you'll need to set some environmental variables:
# Use the Coprocessor Simulator
export CNY_SIM_THREAD=libcpSimLib2.so
# Point to the emulator
export CNY_CAE_EMULATOR=~/pdk_sample/cae_pers_vadd/CaeSimPers/CaeSimPers
After setting the environmental variables, rerun the app:
cd ~/pdk_sample/SampleAppVadd/
./UserApp.exe
The program will pause at the following screen for a 10-20 seconds...
...and then finish running the program.
Assignment 2
[1] This is a great website teachs us how it works, and it also provide some examples, which help us to implement in C code.
Sobel edge detection algorithm code with C (Since the code is very long, I just show key part of algorithm):
  int sobel(double threshold) {
  unsigned int  x, y, i, v, u;             // for loop counter
  unsigned char R, G, B;         // color of R, G, B
  double val[MASK_N] = {0.0};
  int adjustX, adjustY, xBound, yBound;
  double total;

  for(y = 0; y != height; ++y) {
    for(x = 0; x != width; ++x) {
      for(i = 0; i != MASK_N; ++i) {
        adjustX = (MASK_X % 2) ? 1 : 0;
                adjustY = (MASK_Y % 2) ? 1 : 0;
                xBound = MASK_X / 2;
                yBound = MASK_Y / 2;

        val[i] = 0.0;
        for(v = -yBound; v != yBound + adjustY; ++v) {
                    for (u = -xBound; u != xBound + adjustX; ++u) {
            if (x + u >= 0 && x + u < width && y + v >= 0 && y + v < height) {
              R = *(image_s + byte_per_pixel * (width * (y+v) + (x+u)) + 2);
              G = *(image_s + byte_per_pixel * (width * (y+v) + (x+u)) + 1);
              B = *(image_s + byte_per_pixel * (width * (y+v) + (x+u)) + 0);

                  val[i] +=    color_to_int(R, G, B) * mask[i][u + xBound][v + yBound];
            }
                    }
        }
      }

      total = 0.0;
      for (i = 0; i != MASK_N; ++i) {
              total += val[i] * val[i];
      }

          total = sqrt(total);

      if (total - threshold >= 0) {
        // black
        *(image_t + byte_per_pixel * (width * y + x) + 2) = BLACK;
        *(image_t + byte_per_pixel * (width * y + x) + 1) = BLACK;
        *(image_t + byte_per_pixel * (width * y + x) + 0) = BLACK;
      }
            else {
              // white
        *(image_t + byte_per_pixel * (width * y + x) + 2) = WHITE;
        *(image_t + byte_per_pixel * (width * y + x) + 1) = WHITE;
        *(image_t + byte_per_pixel * (width * y + x) + 0) = WHITE;
      }
    }
  }

  return 0;
}
We use color lena with 24bit bmp file


